Friday, August 23, 2019

Electric VW finally coming out of "hibernation"
after five years in the barn.

I had been keeping the VW in the barn for over five years, waiting for inexpensive Lithium-Ion (LI) batteries to become available. Never happened. Last fall I bought a complete LI battery pack out of a Nissan Leaf electric vehicle. I had planned on reconfiguring it for the VW. After a lot of research, I realized the cost exceeded the benefit. I sold it on eBay.

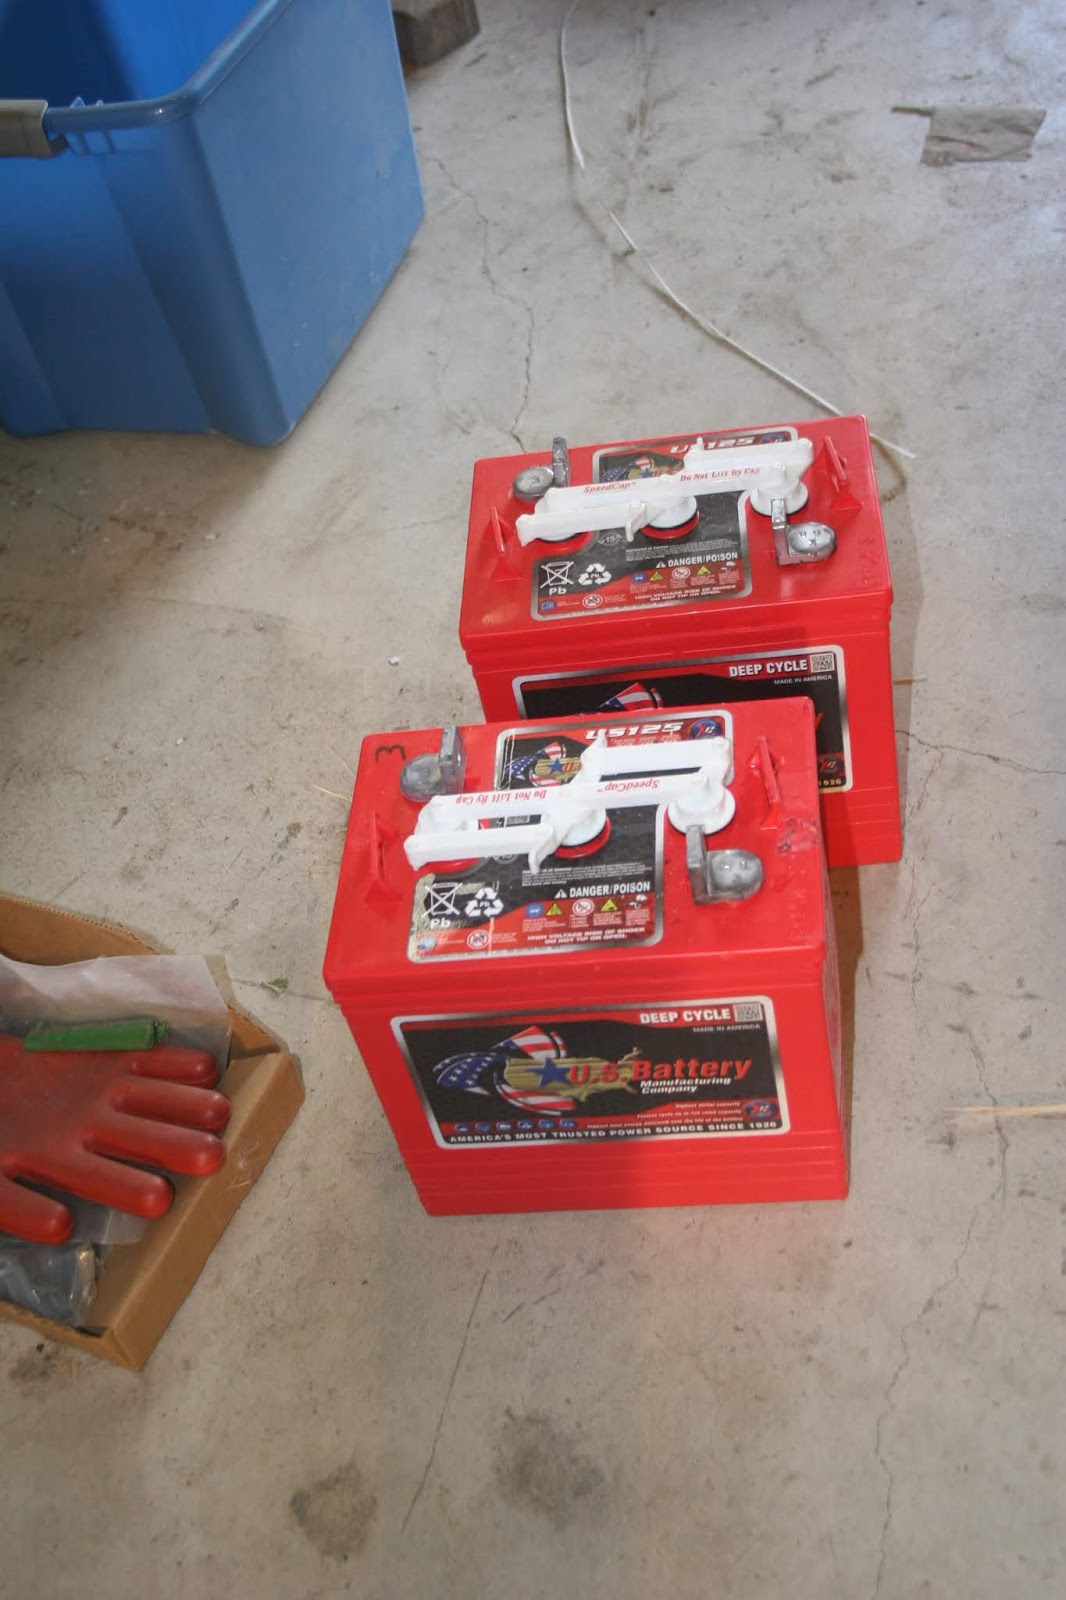
The original golf cart battery pack worked well. I drove it for five years and 20,000 miles. The new battery set will have slightly more energy, per battery, plus I have added two more, for a total of 18. This raised the nominal voltage from 97 volt to 108 volts. 

The previous driving range was 45 miles, more or less, with a cruising speed of 55 MPH. Top speed was 75 MPH. With the larger pack, I expect about ten percent more range and speed. (I will report the results, later.)

It has been hard to find the time to work on the VW rehab because of our expanding family business. (www.rjrtractor.com)  It's been an hour, or two, here and an hour, or two, there. I am hoping to spend most of tomorrow, Saturday (8/24/2019) working on the car … and hoping there are not too many "Honey Do" projects.

If I get a full day tomorrow to work, I will probably be ready to make a first test run. It will take five or six RUN/RECHARGE cycles to get the battery pack conditioned for max output.

For recharging, I have updated my Manzanita Micro PFC25 Charger to the latest configuration. It should be much easier to use and safer for the batteries. I am expecting it will take about one hour of recharging, using a 240 volt supply, for every ten miles of driving. An 18 miles run into and return from town will take about two hours of charging.

Since virtually all the power for charging will come from our 10kW solar system, the cost to drive the car will be minimal.

Stay tuned ... 

Center "Saddleback Battery Holders located under the rear seat. (Two added batteries)
Front Battery Pack Installed
US125 Golf Cart Batteries (Total of 18 in car)
"Blackie" the Tech helper. (Stray cat that adopted us about a year ago.)

Rear Battery Pack Installed


Tuesday, December 11, 2018

Ho-Ho-Ho... not so much!

 12/11/2018

Snowing today.

VW is sitting exactly as it was in the last post. I hope to get back to the lithium installation in January.

Golf cart fixed:

> Bad controller - installed new Alltrax 400 amp controller.

> Left axle broke and the wheel fell off! Replaced the axle. (Bought from Buggies Unlimited - a highly recommended company.)

> Installed two solar panels on the top of the cart, replacing the plastic top. I used a "boost type" charge controller to charge the 48vdc battery pack. I have been using the cart for running around the ranch for several months and have not had to use any aux. charging.

> Added two LED driving lights. Mounted one on the left front edge of the solar module and one on the right front edge. Works GREAT!

Tuesday, July 31, 2018


No progress on VW

Too many "must do" projects, right now.
  • Broken water line to our underground sprinkler system. Lawn looks completely disreputable i.e., looks like hell!
  • Electric golf cart suddenly quit last week. I need to troubleshoot it and fix. Getting tired of long walk to the barn/shop and back several times a day.
  • Weeds growing like there is no tomorrow. I need to start making that happen.
  • Wife and I picked up and hand unloaded 1200 lbs. of chicken feed. 

Friday, July 27, 2018


RESURRECTION!

 
For the last five years my Electric VW Cabriolet has been "lounging" in my barn. Prior to the "internment" I drove it almost 20,000 miles, until the original set of 16 golf-cart batteries finally pooped out. It was my intent to replace the "flooded lead-acid" batteries with Lithium cells. At that time, Lithium was very expensive. I calculated to obtain the same performance, the Lithium battery pack would cost around $12,000. I decided to wait until the cost declined substantially.
 
Gradually, the cost for Lithium dropped ... but until last years, it was still over $7,000. With the wide acceptance of comsumer electric vehicles, such as the Toyota Prius, the Chevrolet Volt and the Nissan Leaf, there were a certain number of these vehicles that ended up crashed. One vehicle, in particular, the Nissan Leaf, had a Lithium battery pack that was quite adaptable to custom-made electric vehicles. Many were salvaged.
 
 This is a battery pack from a Nissan Leaf that I purchased last week. It consistes of 48 lithium modules, each about 8 vdc, for a total of about 385 vdc. Since my VW's controller has a maximum voltage rating of 144 dvc, I will split the battery pack into three parallel strings of 16 modules, each, for an output voltage of 128 vdc. (My original golf cart battery pack was 96vdc.)
 
With the original battery pack, my maximum range was about 50 miles and a top speed of 65 mph. With this new lithium pack, I am hoping for about 50% great numbers. 
 
Follow along, from day-to-day, as I upgrade the vehicle.
My hope is to be up and running by mid-August.


Thursday, August 18, 2011

Newest converted electric vehicle

Saturday, March 12, 2011

New Project

I'm starting a new project: Converting my John Deere L111 Riding Lawn Tractor to All-Electric, 100% battery power. Follow at: http://ElectricTractor.blogspot.com

Sunday, May 16, 2010

Turning Sunlight into Road Miles

Last Saturday, I taught a class in building a solar array. After the class was over I thought, "Why not put that project to good use." Hence: Here is the 875 watt solar array re-charging the batteries in my electric VW. What more can you ask for ... Sunlight to Road miles!

Tuesday, April 20, 2010

Nice Driving Weather ... Finally!

Driving again: Beautiful 70+ weather today. It was a good day to take the "Electric Jet" to the barber shop so the driver could get a "spring trim."

Photo shows recharging on the helicopter landing pad. Whenever possible I open the hood for recharging so as to let the gasses escape. This prevents rust from forming in the battery compartment.

Sadly, due to the big John Deere tractor Upgrade project/business, I never got any of the planned winter-downtime improvements done. Hopefully, I'll get to them soon. ("Soon" being quite undefined.)

Adding to the prior items, I've acquired a LINK-10 ("E-Meter") that needs to be installed. This is a very handy gadget which will monitor and log all battery functions.

FIRST on the list is headlight re-wiring! I drove home last night with headlights about as powerful as a 1950 Schwinn bicycle! The problem is typical undersized VW wiring, plus bad grounds. When I get done, I think it will light up the road like a 747 on short final approach!

The original US Battery battery pack is doing better than expected. I figured I would have to replace the pack first thing this year, since this is the fourth year on the pack. So far, it's still chugging well after 25 miles, which will get me to Pullman, and back, still with a little reserve to run around in town a bit. (Down from the initial 50 mile range) I haven't actually "pushed it" to see what the actual range is, however I have definitely noticed that the range is increasing as I drive it this year.

I plan to add two more 6-volt batteries, using the Electro Automotive under the floor battery box. It looks very well designed, as is all their products.

Rob, another Cabbie Converter (http://chaosmgmt.blogspot.com) just installed a lithium-ion pack. I'm watching that carefully and might consider it, if the price is right. Other than being able to extend the vehicle range an amount farther than I usually drive and allow me to spin the wheels and beat most cars to the first stop-light, I really can get along with my faithful non-BMS lead-acid batteries. (Re: Smoking Tires - Pullman is a "Small Town" and too many people know me!)

Stay Tuned ...

Sunday, January 10, 2010

Next "Electrifying" Project

NEXT PROJECT
How about an Electric, Solar Charged, "Off-Road Monster," Golf Cart?
Yeah ... I think so!

Step 1: Install a 6" Lift Kit and cool-looking wheels and tires.

The future:

  • New Paint Job
  • New upholstery that is appropriate for the new paint.
  • Headlights
  • Add a bunch of chrome
  • Convert from gas power to electric power
  • Install a solar module on top to keep the running batteries fully charged.
  • Oh yes ... Seat Belts!

Tuesday, December 08, 2009

Things Are Heating Up

Now that Winter is upon us, (-3F tonight) it's time to pull the Electric Jet out of service for winter maintenance. I basically have three projects: Add a heater; Improve headlights; Fix the door and window operation.


Heater: I have mocked up a possible heater setup ... and it seems to work well. Now I have to install in the car.


At first, I planned on installing an electric ceramic heater, as many have done, but decided against that because of potential safety issues. I think hot water will work better.


I bought a small hot water heater tank that is used in the winter as an engine block heater. (eBay) It has a 1000 watt 115vac heater element and will work on 96vdc, just fine. (Tank heaters are available up to 2000 watts.) I used a small 12 vdc hot water pump used in solar hot water systems to circulate the water. (El-Sid pump). Hooking all this in series with a new VW heater core, I proved that it will put out a good supply of hot air.


I will wire it in, in such a manner that I can run the heater on aux. home power for a time before departing, so as to pre-heat the car interior. When I'm ready to depart, I will switch it over to car power.


Before you ask: The whole heater system will require about 1,100 watts of power, when ON. Compare that to the 20,000 watts of power the car uses in normal cruise. This computes out to about an added 5% requirement, which in most cases will not affect power or range to any appreciable amount.


I think this will be a safe system, with minimal amount of controls required. If it starts to overheat, the hot water heater tank has a internal cut-off thermostat switch.


What could be easier?

Saturday, April 04, 2009

What Happens When You Short Out The Pack

Here is why I always wear gloves and eye protection!

Today, I was doing the spring battery maintenance, which consisted of topping off the water and tightening the battery terminal connections. For the tightning, I use a 1/2" box end wrench that is wrapped with electrical tape. The only exposed part is the box end.


Today, however, I needed an extra wrench and I just grabbed another, unwrapped wrench. Unfortunately, it slipped and shorted across the entire pack of batteries in the rear of the car. This was "only" eight of the sixteen in the car. When it crossed the terminals, it was like a Fourth of July display, with hot molten steel flying in all directions. I can't imagine what would happen if full pack had been shorted.

In the second picture, you can see chunks of molten steel and tracks across the battery tops where the hot metal rolled across.

Word to EV builders and owners: BE CAREFUL.


Saturday, January 24, 2009

Possible Design Defect

In my opinion there is a design defect in the Electro Automotive VW wiring scheme:

I have lost two 12 vdc vehicle aux. batteries. Last week, the second aux. battery ended up fully discharged … and frozen. (The temp in my barn has been in the 0-25 deg. F range.)

Remember from my last blog entry, I discussed long maintenance charges?

Here's the problem:

Whenever external power is plugged into the car outlet for charging, the 12vdc fan is activated to ventilate the rear battery box. The fan is powered from the aux. battery During this time, there is no recharging of the aux. battery. It's the same as leaving the car lights ON, when leaving the car ... albeit, with a much lower current draw.

I frequently plug in my charger in the afternoon, upon return home, and leave it ON all night, as my PFC-20, turns OFF at the appropriate time. It seemed like there was no downside to this technique. Several times, when the power was plugged in for extended times, even with the charger OFF, the aux. battery became fully discharged, eventually resulting in my buying a new battery.

During the worst of this winter, my car stays in the barn. In order to preserve the batteries, I use my PFC 20 to frequently charge the batteries. Last week, I left the charger on for 24 hours, in 10 deg. weather, with the charger set at the appropriate float voltage. When I checked later, I discovered the fan stopped, the aux, battery dead ... and frozen! I now have to buy another new battery.

I think it's a poor design to run the battery box ventilator with a 12vdc fan, powered from a source that isn't kept charged. I plan on replacing the fan, ASAP, with a 120vac fan that runs from external house power whenever the vehicle is plugged in.

If this situation applies to you, I suggest you replace the 12vdc fan with a 125vac fan, wired in appropriately.

Just my opinion.

Friday, January 09, 2009

Winter Upkeep: Part 2

In battery lore, there are two critical numbers: The first is the "Charge to" voltage, sometimes referred to as the "Acceptance" voltage. This the the voltage the pack should be charged to after usage. The second number is the "float" voltage. This is the voltage the pack should be held to when not being used i.e., the pack should float along at this voltage when idle. Both voltages are computed, based upon battery type and battery temperatures, among other things.

In the case of my pack, the float voltage at the 30-35 deg.F, is 105.95 - 106.25 volts. Using a thermometer, my PFC20 charger and a lab quality digital voltmeter, I am going to float the pack for a day, or so, to do a rather lengthy "equalizing balance."


(CLICK photo for a larger image)

Sunday, January 04, 2009

Winter Upkeep


It's not the best electric vehicle weather ... especially considering that we're having a hard time even getting our Volvo XC90 (4-wheel drive!) out to the county road.

So, for the time being the VW is staying in the unheated garage/barn. While there, I'm being very careful to keep the batteries fully charged. I have a chart from the battery manufacturer (U S Battery) that states the "charge to" and "float" voltages. Using my HP precision digital voltmeter to monitor my Manzanita Micro PFC20 charger, I periodically do a charge to the "charge to" voltage, followed by a 30-min equalizing charge. This is the same technique I used last year. Even though the vehicle sat for about three months in temperatures as low as -10 degF, when I reactivated the VW, last spring, I saw virtually no loss from the batteries! I hope I can say the same thing this spring!

As far as the video, I mentioned in an earlier blog, that will have to wait until spring. I will get it done ... promise!

Monday, December 08, 2008

No Heat - No Problem

For some time now, I have been "getting ready" to take on the task of adding a heater to the Cabbie. There are, by my count, about three reasonable possibilities:


Option One: Replace the old hot water heater with an electric ceramic element. The ceramic element would be installed in the original VW heater box, along with the appropriate electric controls to run it. This would make a nice professional installation and the heater would function much like the original VW unit. I actually have all the parts gathered together ... I just haven't gotten around to it.


Option Two: I have read about several heater installations involving conventional hair driers. Since the hair drier really doesn't care if it's plugged into the household 115 vac outlet or my 98-volt DC battery pack, the hair drier will run just fine (maybe even better!) and put out copious amounts of hot air. Some builders have stuck the end of the drier into one of the car's air vent lines and simply switched it ON/OFF manually. An advantage of the hair drier is it can be pointed directly at the windshield for fast defrost or defog. I'm thinking: If I constructed a small metal box as a "docking station" to hold the hair drier, the box could direct the warm air from the drier into the cabin area. Then if I needed defrosting or defogging, I just lift the hair drier from it's "docking station", then return it when the windshield has been cleared. I actually am beginning to favor this approach ... to the point that I will probably give it a try ... after I get tired of Option Three!


Option Three: Do nothing! I've been driving quite a bit in 25-28 deg. F, weather with no heater and it really isn't all that bad! With a warm coat, light gloves and a warm hat, I don't mind it that much during my nine-mile work commute. After all, it would usually take three or four miles for a conventional car to warm up, so you would dress warmly, anyway.


BOTTOM LINE: Don't get too worked up over how to get heat into your conversion. Just make sure all the holes in the vehicle firewall are plugged. I had one pretty good sized hole where the old heater assembly came out and that let in a lot of cold air, while driving. Once the air leaks were plugged, as I mentioned, "It really isn't all that bad."


HINT: If I have the chance, I "pre-heat" the cabin, using a small 115 vac ceramic type heater. (Yes, the one that I planned on taking apart to permanently install in the car.) If I know I'll be driving in 15-30 minutes, I put the heater on the floor of the passenger side, being EXTREMELY careful that it isn't in any position to overheat any part of the car (Like in: Catch on fire!) The warmed up car feels pretty good and the heat will persist for several miles.


Sunday, October 12, 2008

What it like to drive an EV

Stay Tuned:

Before too long I'll grab the video camera and take you on an informative tour and ride in my "Electric VW."

Monday, September 01, 2008

Road Report

It's been about two weeks since I have the car back on the road after the front end rebuild.

It drives almost like a new car. I am particularily impressed with the Bilstein shocks. The ride is "Euro-Firm." I like it: It reminds me of my last Audi i.e., great road feel and very positive steering. It also helped to get the lower anti-roll bar reinstalled, along with the upper strut tower support fixture. (I have to ask myself: "Why didn't I do this sooner?")

Next project will be headlights and heater.

Sunday, August 17, 2008

Work-In-Progress


As of today, I have one side completed. I would have been done, but discovered yesterday that one upper strut bearing plate was worn beyond limits. No one in town carries the part so it was ordered thru Schuck's Auto Parts. It will be here Monday AM. (I endorse Schuck's. They are very responsive to parts orders.)

A Bilstein performance strut assembly ... The Best!

New driveshaft/CV joint assembly. Both left and right were replaced.

Upon initial build of the car, I did not attach the upper stabilizer bar because it interferred with the mounting plates for the DC/DC converter, the main contactor and the throttle pot. I trimmed down the mounting plates and now the bar fits. (I put a lot of work into getting a great paint job on the bar.)


Here is a pix of the strut assembly installed in the right side of the car. The springs are not stock, but custom wound units designed to handle the added battery weight AND lower the car about 1-1/2" (38 mm)


A new ball joint.


Saturday, August 02, 2008

Time-Out

The V-Dub is down for a little maintenance. It has been very reliable transportation for me for over 3000 miles, since the conversion was completed almost exactly one year ago.

Last night, while driving to town, I heard a very distinctive "grinding" sound. I had a very good idea what it was: The CV joints. I knew they needed replacing, even when I first started to drive the car after conversion, last year. In fact, I have had the replacement drive shafts/CV joints on hand for several months, waiting until "I felt like" replacing them. I now "feel like it!" Today, I started the disassembly of the front end and will do the following repairs:

* Replace both drive shafts and CV joints. (Interesting note: The shafts I have had for several months are the wrong ones! Fortunately, I have the original receipt and can exchange for the correct ones.)

* I discovered that the wheel bearing on the left-front wheel was totally worn out. I'll replace that, along with the right-front, just as a preventing measure.

* The right-front steering tie-rod end will be replaced. (It was actually OK, but got a little "banged-up" during removal.)

* Both front strut cartridges (shock absorbers) will be replaced. I bought new ones when I did the conversion, but they failed almost immediately. (That's what you get for trying to save a buck ... even though they were advertised as "performance.")

* I have had a tachometer adapter for almost a year, but never installed it because it takes a little drilling into the transmission case. I'll get that done this time.

* Since I do a lot of driving at night, I need to do some work on the headlights. The wiring is old, resulting in less than optimum light output. They also need to be re-aimed.

That's probably enough work for this cycle. This winter, I'll catch up on a few more improvements/repairs. The major deferred project is a heater!

Watch this blog for photos and updates as the work progresses.

Sunday, June 01, 2008

I'm Getting A Charge Out Of You

This is the Manzanita Micro PFC-20 Charger that I have installed in the truck of the VW. The "AMPS" control sets the charging current. I have marked two positions: 15 AMPS (for charging from a normal 120V household outlet) and a 20 AMP position, which it is currently set at. (I have a dedicated 20 AMP circuit in the barn.) If I used the 20 AMP position for "away from home" charging, I would probably trip the circuit breaker ... NOT a good way to impress friends and neighbors!

These are the controls for adjusting the time the charger "floats" the battery pack after charging. This is to balance the sixteen batteries in the pack.
The left arrow points to the rotary switch that lets you "guess" what the balance/float time is. It is a 16-position rotary switch with no hint as to timing except to state that the "three o'clock position" is zero time ... it's kind of a "try it and see" approach. (This could be improved.) This is why I'm using the recording chart device to monitor the times.
The right row of switches (installed upside-down ... intentionally, I guess for assembly convenience) selects the various charge/float options. The #1 switch ON, as I have selected, selects the option for the balance/float to start as soon as the charger senses the pack has reached the selected charge voltage.

A vintage Omega chart recorder that I bought on eBay, several years ago. This is the first real application that I have used it in. Works great!
Here is the latest recording that I made after after an eighteen mile trip to Pullman and back. You can see that the charge time was 3.5 hours, followed by an approximate one hour very low power balance/float.

With the current cost of electricity here, the total trip cost would have been approximately TWENTY CENTS! I say: "Would have been," because our solar electric system is currently generating MORE power than it takes to recharge the car. We get free "gas" and what's left over, we sell back to the power company! What's better than that?
See -> http://rjrenergy.blogspot.com

(CLICK pictures for a larger image)